Reese®Peanut Butter Chocolate Puffs Treats #DoYouSpoon

Reese® Peanut Butter Chocolate Spread, Marshmallows and Reese® Puffs Cereal

Reese® Peanut Butter Chocolate Spread, Marshmallows and Reese® Puffs Cereal

There are flavour and food combinations that resonate with everyone. Milk and chocolate sandwich cookies, bacon and eggs and to me especially Peanut Butter and Chocolate! I remember as a child enjoying a scoop or two of Peanut Butter and Chocolate ice cream from that 31 flavours ice cream shop. ;P

Well now available in Canada is Reese® Spread Peanut Butter Chocolate.

Food Bloggers of Canada member opportunity has made it possible for me as well as other great Food Bloggers to participate in developing a recipe using this new spread. After much brainstorming, my kids thought that making a cereal treat would be the most fun and would be perfect for a Halloween party snack or lunch box treat.

I made the Reese® Spread Cereal Treats using my son’s favourite cereal General Mills® Reese®Puffs cereal and pressed the mixture into my Chicago Metallic™ Lasagna Trio Pan for long loaf size shape slices and also used a mini muffin tin to form golf ball-sized sphere treats.

For more ideas Visit REESE Canada for more recipe ideas and Reese Canada Facebook page

Follow my Instagram @the5oclockrush to see my daily dinners photos.

Reese®Peanut Butter and Chocolate Puff Treats #DoYouSpoon

Reese® Peanut Butter and Chocolate Puffs Cereal Treats #DoYouSpoon

Reese® Peanut Butter and Chocolate Puffs Cereal Treats #DoYouSpoon

Reese® Puffs Cereal, Reese® Spreads and Mini Marshmallows

Reese® Puffs Cereal, Reese® Spreads and Mini Marshmallows

Mise En Place

  • 3 tablespoons butter
  • 5 cups Miniature Marshmallows
  • ½ cup Reese® Spread peanut butter chocolate
  • 6 cups General Mills® Reese® Puffs cereal
  • ¼ cup Reese® mini pieces baking chips (if desired)

MICROWAVE DIRECTIONS:

In microwave-safe bowl heat butter on HIGH for 15-20 seconds, remove from microwave, and then add Reese® peanut butter chocolate spread, stir until combined. Add marshmallows to the butter peanut butter chocolate spread mixture on HIGH for 3 minutes, stirring after 2 minutes. Stir until smooth. Microwave cooking times may vary.

Melted Marshmallows with Reese® Peanut Butter and Chocolate Spread

Melted Marshmallows with Reese® Peanut Butter Chocolate Spread

Working quickly add General Mills® Reese® Puffs cereal. Stir until well coated.

Sprinkle Reese® mini pieces into a lightly coated with cooking spray 13 x 9 x 2-inch pan or loaf pan. Using buttered spatula evenly press mixture into the prepared pan. Cool. Cut into 1-inch slices. Or form the mixture into golf ball-size spheres and gently roll in Reese® mini pieces. Best if served the same day.

Reese® Peanut Butter and Chocolate Cereal Treats #DoYouSpoon

Reese® Peanut Butter Chocolate Puffs Treats #DoYouSpoon

For best results, use fresh marshmallows.

Store no more than two days at room temperature in airtight container. To freeze, place in layers separated by wax paper in airtight container. Freeze for up to 6 weeks. Let stand at room temperature for 15 minutes before serving.

Disclosure: This blog post is sponsored by Hershey’s Canada. I was compensated monetarily and with product. All opinions and experiences are my own.

Spelt Risotto with Roasted Butternut Squash

Spelt Risotto with Roasted Butternut Squash

My dinner options for Wednesday were very slim. I had already used the “egg” option on Tuesday night with Mini Goat Cheese, Bacon and Leek Quiches. I was contemplating the grilled cheese cop-out since I need to be out the door and on the ice for 7pm.

This box of Spelt grains in my cupboard was calling to me for sometime. I have never cooked Spelt or even made a Spelt Risotto. I did know that the grains could be cooked in the same method of risotto.

I had all the ingredients for a risotto and decided to tackle it in the short time frame.

I love cooking Risotto. And I think I have pretty much mastered the process. 😉 Risotto is a great change-up from rice or pasta.

I found that the Spelt grains were much more forgiving than Arborio rice. I could actually walk away from the stove which is something you shouldn’t do. And I used a little more stock than when I cook a regular risotto. I tasted the texture of the spelt  a lot through the last part of the cooking process.

If I had planned better I would have used sage instead of the herbs listed in the recipe below; it tasted fantastic with that combination. It was a hit with the family. And an awesome vegetarian option especially since it is high in protein.

I recently hosted a birthday dinner for my friend Emma. The Menu’s theme for the Dinner Party was Spring even though the weather was NOT. I made an awesome Risotto with Roasted Shrimp, Peas and Edamame.

Birthday Dinner Pictures below:

Appetizer: Marinated Salmon Rollup

Appetizer: Marinated Salmon Roll-up

Appetizer: Brie, Figs and Pear

Appetizer: Brie, Figs and Pear

Asparagus Salad

Asparagus Salad

Risotto with Shrimp, Peas, and Edamame

Risotto with Shrimp, Peas, and Edamame

Dessert: Homemade Lemon Sorbet with Maple Syrup Blueberries

Dessert: Homemade Lemon Sorbet with Maple Syrup Blueberries

Always check out my Instagram @the5oclockrush  to see my daily dinners photos.

Continue reading

Ricardo’s Maple-Glazed Drumsticks

Today is the last day of March and the weather is not very Spring-like in Ontario. It actually snowed today in southern Ontario. It is hard to believe that Easter is this weekend. There are those key main ingredients when I think of an Easter dinner: Ham, turkey or leg of lamb are the traditional choices.

I was pleasantly surprised when I was approach by Ricardo’s team to review a recipe from the Easter category on my website. The Ricardo’s Cuisine website has an enormous selection of recipes for any occasion and daily dinners, plus the level of difficulty ranges from very quick easy to more elaborate and technical recipes.

Ricardo’s Cuisine has 139 Delicious Easter Dinner & Dessert Recipes which offers many unique choices for a complete Easter dinner. Ricardo’s Cuisine has also made it easy with an Easter Meal Planner that includes Ricardo’s Favorite Easter Menu.

There were so many recipes to choose from the Easter section alone. There are some very Canadian and Québécois recipes such as Daniel Vézina’s Maple Sugar Pie which include lots of maple syrup. ❤  I wanted to attempt the Bell Pepper and Asparagus Tart and the Cream of Asparagus Soup with Parmesan and Poached Eggs. But in this short time frame, and I wanted to choose a recipe that would be Dinner Tonight for the 5 o’clock rush.

I chose to review Maple-Glazed Drumsticks which is a simple non-traditional Easter recipe.

I think the recipe for the Maple-Glazed Drumsticks is very simple and cost-effective for a large Easter gathering or would be great for any occasion such as a potluck or buffet. This recipe could easily be adapted for wings and would be awesome in the heat of summer on the bbq (still on foiled-lined baking tray or disposable foil tray).

I marinated the chicken legs overnight and I basted them twice during the cooking process. The flavour was a great combination of sweet and tangy. The legs were sticky and the kids enjoyed them and asked for seconds. I served the Maple-Glazed Drumsticks with Basmati Rice with mixture of melted butter and coconut oil and sweet corn.

Now I want to tackle the Maple Pull-Apart Bread Recipe because the kids favourite ‘big name grocery store’ maple bread is always out of stock and this would be a great replacement. 😉

Ricardo’s Maple-Glazed Drumsticks Recipe

Prep Time 15 min Cooking Time 45 min Serves 4
Maple-Glazed Drumsticks

My Dinner Plate of Maple-Glazed Drumsticks

Mise En Place

Marinated Chicken Legs

Marinated Chicken Legs

  • 12 chicken drumsticks, with the skin*
  • ½ cup (125 ml) maple syrup
  • ½ cup (125 ml) chili sauce
  • 1/4 cup (60 ml) white wine vinegar
  • 6 cloves garlic, peeled and lightly crushed
  • ½ tsp salt
  • ½ tsp black pepper

In a glass dish or in a resealable plastic bag, combine all the ingredients except for the drumsticks. Season with salt and pepper. Add the drumsticks and coat well with the marinade. Cover the dish or seal the bag. Refrigerate for 2 to 8 hours.

Marinated Chicken Drumsticks

Marinated Chicken Drumsticks

With the rack in the middle position, preheat the oven to 200 °C (400 °F). Line a baking sheet with aluminum foil.

Drain and reserve the drumsticks marinade for basting. Spread the drumsticks on the baking sheet. Bake for about 40 minutes or until the chicken is cooked. Brush the drumsticks with the marinade several times during cooking.

Finish cooking under the broiler for about 5 minutes or until the drumsticks are golden brown. Serve with rice or roasted potatoes and a green vegetable.

Ricardo's Maple-Glazed Drumsticks

My Dinner Plate of Ricardo’s Maple-Glazed Drumsticks

*For a deeper flavour, you can, using the tip of a knife or kitchen shears, make three or four incisions lengthwise in each drumstick before marinating.

The 5 o’clock rush has not been compensated by Ricardo Cuisine for writing this post and all opinions shared are my own.

Always check out my Instagram @the5oclockrush  to see my daily dinners photos.

Loaded 'Baked' Potato Pizza

Loaded ‘Baked’ Potato Pizza

If you are regular viewer of the 5 o’clock rush especially on Instagram, you will notice that I like to include a starch with my daily dinners. This could be rice, pasta, bread and especially potatoes.

So when I had this awesome opportunity to create a unique potato recipe using The Little Potato Company ® I was more than thrilled.


The Little Potato Company Potatoes

The Little Potato Company Potatoes

The great features about these potatoes are:

  • Proprietary potatoes – grown to full maturity
  • Available year-round and always in stock
  • Even cooking time
  • High quality – grown with care and hand-sorted
  • Fresh – straight from the farm
  • Quick – pre-washed, no peeling, no waste or extra prep
  • Nutritious – fat, gluten, and cholesterol free
  • Thin skinned – excellent source of potassium
  • Easy to prepare – roast, microwave, oven, BBQ
  • Great plate appeal

I received two of The Little Potato Company ® varieties:

Something Blue ™ has a unique, beautiful contrast of colours – yellow flesh with purple streaks, and bright blue/purple skin. Something Blue delivers a well-balanced, slightly exotic flavour that has great colour retention, and is excellent for roasting or barbecuing.

The Little Potato Company Potatoes

The Little Potato Company Potatoes

Blushing Belle ™ is extremely versatile, and adapts well to a variety of cooking methods. Named after its blushing red skin and buttery yellow flesh, Blushing Belle delivers a soft, light texture with mild, delicate flavor. Excellent roasted or mashed.

The Little Potato Company ® potatoes are also available in a MICROWAVE READY varieties.

Providing freshly steamed, perfectly seasoned potatoes in just minutes, Microwave Ready kits are all about making wholesome and delicious that much easier. Simply microwave in the conveniently included steam tray, toss with the precisely pre-mixed seasoning and voila – full-on flavour the whole family will love. The only hard part will be deciding which flavour to try first!

My ‘chef’ thinking cap came up with this recipe for Loaded ‘Baked’ Potato Pizza.

Some of the components of a Loaded Baked Potato that I enjoy are bacon, chives, broccoli and loads of cheese or cheese sauce put on another favourite of mine…..PIZZA! And then add sour cream for dipping.

I decided to make a homemade crust for this recipe. The pizza crust recipe is from The Pioneer Woman Cooks, Ree Drummond who is an adventurous and creative food blogger. Ree’s recipe below is better made ahead at least 24 hours in advance. But it is super easy and very user-friendly.

There is always the option to use a store-bought pizza crust or even Naan bread.

My Favorite Pizza from The Pioneer Woman Cooks

Makes 2 Crusts

Mise En Place

  • 1 teaspoon Active Dry Or Instant Yeast
  • 4 cups All-purpose Flour
  • 1 teaspoon Kosher Salt
  • 1/3 cup Extra Virgin Olive Oil

Sprinkle yeast over 1 1/2 cups warm (not lukewarm) water.
In a mixer, combine flour and salt. With the mixer running on low-speed (with paddle attachment), drizzle in olive oil until combined with flour. Next, pour in yeast/water mixture and mix until just combined.

Coat a separate mixing bowl with a light drizzle of olive oil, and form the dough into a ball. Toss to coat dough in olive oil, then cover the bowl tightly with plastic wrap and store in the fridge until you need it.

*** It’s best to make the dough at least 24 hours in advance, and 3 or 4 days is even better.

Cheddar Cheese Sauce

Mise En Place

Mise En Place

Mise En Place

  • 2 tbsp. butter
  • 2 tbsp. all-purpose flour
  • 1 cup milk
  • 1 cup extra old Cheddar cheese, grated
  • 1 cup Herb cheese
  • ¼ tsp. salt
  • ¼ tsp. pepper
  • ½ tsp. Red Hot sauce

In saucepan, melt butter over medium heat; whisk in flour and cook, stirring, for 1 minute. Gradually whisk in milk and cook, whisking constantly, until thickened, about 7 minutes. Remove from heat. Stir in cheese, salt, pepper, and Red Hot until cheese is melted.

There is a new cheese sauce available on your grocery store shelves, which can be used in a pinch.

Loaded ‘Baked’ Potato Pizza

Loaded "Baked" Potato Pizza with Sour Cream

Loaded “Baked” Potato Pizza with Sour Cream

Loaded Baked Potato Pizza

Loaded ‘Baked’ Potato Pizza

Mise En Place

Toppings Mise En Place

Toppings Mise En Place
Bacon, Green Onions, Chives and Broccoli

  • Pizza Dough recipe above, halved
  • 1 cup favourite pizza or tomato sauce
  • 1 cup Cheddar cheese sauce, recipe above
  • 2 cups mozzarella, grated
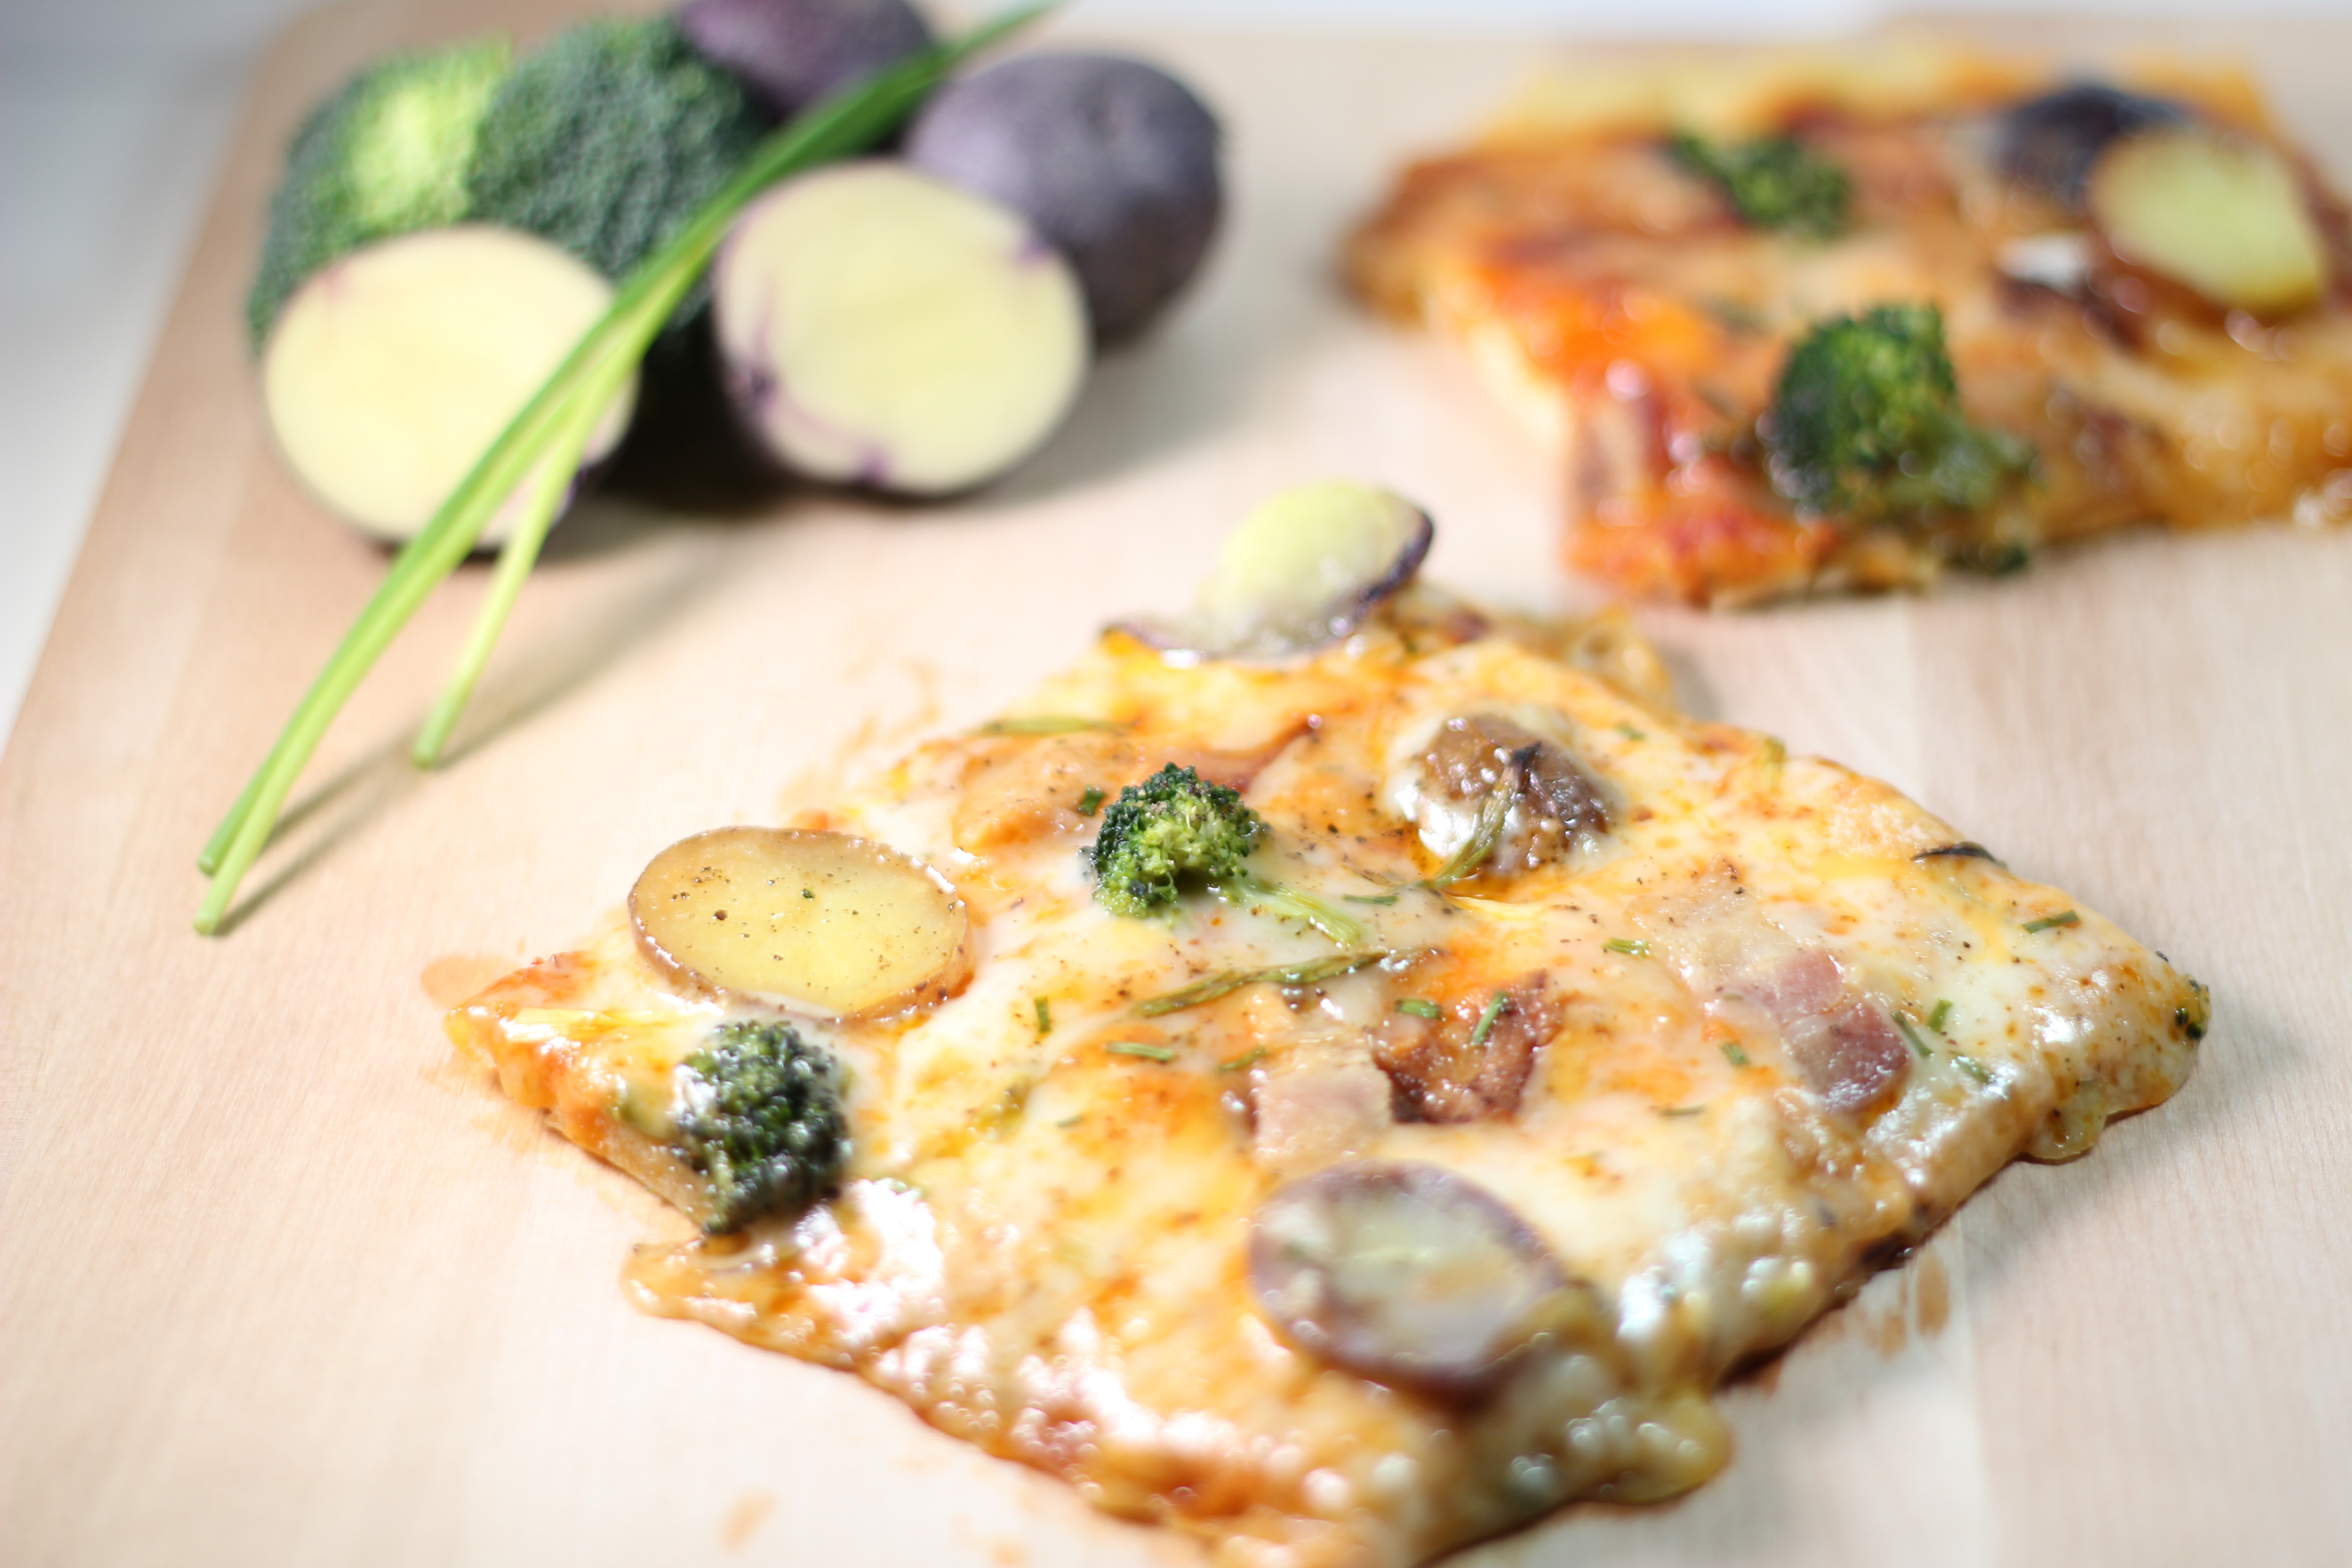
  • 6 The Little Potato Company ® Blushing Belles potatoes™, cooked and sliced
  • 6 The Little Potato Company ® Something Blues potatoes™, cooked and sliced
  • 1 cup broccoli florets, blanched
  • 4 slices bacon, cooked and cut into pieces
  • 4 green onions, cleaned and sliced on the bias
  • 2 tbsp. fresh chives
  • olive oil
  • salt and pepper

NOTE: I cooked The Little Potato Company ® Blushing Belles potatoes™ and The Little Potato Company ® Something Blues potatoes ™ for 9 minutes as I wanted to ensure that the potatoes remain the ‘circle’ shape. 😉

Preheat oven to 500 degrees.

Drizzle olive oil on a large baking sheet using HALF the pizza dough, and lightly coat the dough with a little olive oil and lightly flour both sides. Pull and stretch on the dough, working it into a thin rectangle shape. No rolling necessary; the dough will be very thin, which is what you are looking for. The dough is very forgiving, if a hole or tear develops in the crust just pinch to seal.

Pizza Crust

Pizza Crust

Once you achieve the desire size and rectangle shape lightly drizzle some olive oil over the crust using your fingers to spread it all over the dough.

Coat the pizza dough with the pizza or tomato based sauce and cheddar cheese sauce leaving a ½ inch border for a crust.

Pizza Crust with Sauce and Cheddar Cheese Sauce

Pizza Crust with Sauce and Cheddar Cheese Sauce

Sprinkle with mozzarella.

Add The Little Potato Company ® Blushing Belles potatoes™ slices and The Little Potato Company ® Something Blues potatoes™ slices alternately as you would pepperoni.

Add the remaining toppings of bacon, broccoli, and green onions.

Sprinkle with salt and pepper.

Bake for 10 to 12 minutes, or until crust is golden brown and the cheese is bubbly. Remove from pan. Sprinkle with fresh chopped chives.

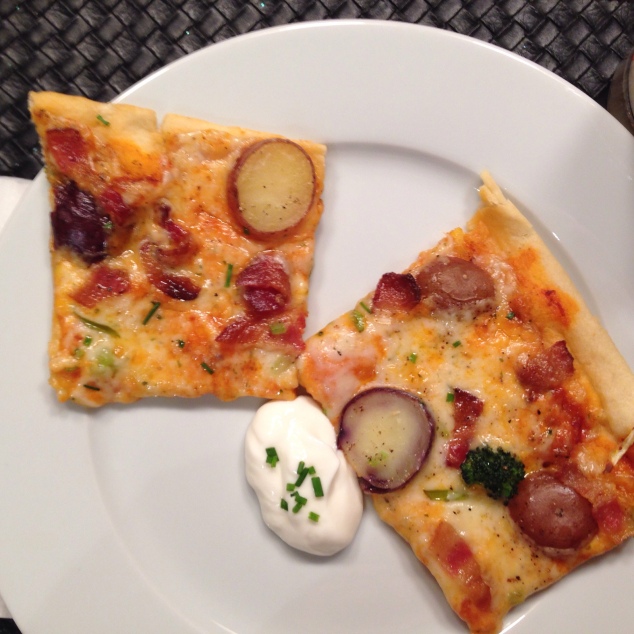
Slice with a pizza cutter. Serve with sour cream for dipping.

TIP: Use your kitchen shears to cut the cooked bacon and to finely cut the fresh chives.

The Loaded ‘Baked’ Potato Pizza was a hit with the family especially with the sour cream for dipping.

All of the toppings including The Little Potato Company ® potatoes could be the leftovers from a previous dinner. The other crust was made into a traditional pepperoni and cheese pizza.

Loaded "Baked" Potato Pizza

Loaded “Baked” Potato Pizza

Loaded 'Baked' Potato Pizza

Loaded ‘Baked’ Potato Pizza

All views are my own. I was contacted by @LittlePotatoCompany to write my honest review about their products. The 5 o’clock rush was not paid to write this post.

My Best Gravy for Thanksgiving Dinner

A Happy Thanksgiving to my American followers.

I hope that you are having an amazing day, watched the Macy’s Day parade and ready for football with family and friends while your feast is roasting and simmering away on the stove.

This is the last post for My Best Gravy for Thanksgiving Dinner will be the best compliment to all the past recipes I have posted for your Thanksgiving feast.

Check them all out here by clicking links below:

My Best Stuffing for Thanksgiving Dinner

My Best Roast Turkey for Thanksgiving Dinner

and the most popular My Best Mashed Potatoes for Thanksgiving Dinner

My Best Gravy for Thanksgiving Dinner

Serves 6-8
Thanksgiving Dinner 2014

Thanksgiving Dinner 2014

Mise En Place

Turkey Stock

Turkey Necks and Vegetables for Stock

Turkey Necks and Vegetables for Stock

  • Neck from your turkey
  • 1 carrot, peeled
  • 1 onion, peeled and quartered
  • 2-3 stalks celery
  • parsley stems
  • 2 bay leaves
  • 2 garlic cloves, peeled
  • 4-6 cups cold water

Combine neck bone, onion, garlic cloves, carrots, parsley stems, bay leaves and celery stalks and 4-6 cups cold water in a medium pot. Bring to a boil over high heat; skim off impurities then reduce heat to low and simmer, uncovered, 1 hour. Pass mixture through a fine sieve. Reserve stock for making gravy.

Remove the turkey from the oven, and place on a cutting board with a rimmed cookie sheet underneath to catch any juices. Cover with aluminium foil and allow resting for at least 30 minutes up to an hour.

Remove the roasted vegetables from the bottom of the pan.

* A trick that I use for a flavourful and thick gravy is to use roasted vegetables. I pass them through a fine-meshed strainer or you could place in a blender with a little of your stock. This puree will be added to the gravy after the roux is formed.

Or if you choose not to use; discard the vegetables.

Making the Gravy

Mise En Place

  • Turkey drippings from your roasting pan
  • pureed vegetables from your roasting pan *
  • 1/2 cup all-purpose flour
  • 2 cups starchy potato water from making your mashed potatoes **
  • 1 cup white wine
  • salt and pepper
  • freshly chopped sage

Place roasting pan on stove across two burners.

Bring pan juices to a simmer over medium-high. Cook, scraping up browned bits with a wooden spoon until smooth and the liquid starts to thicken.

Using these drippings make the roux in the roasting pan with equal amounts of flour to fats in the pan.

Cook, stirring, until blended, about 1 minute.

Add passed or pureed roasted vegetables now if using.

Time to switch to a whisk and gradually add in hot turkey stock, and the reserved starchy potato water ** Just like reserving 1-2 cups of salty pasta cooking water for pasta dishes, I think that there is a little flavour and starchiness in potato water, if you don’t have just leave out.

Add white wine if using, or beer, cider or bourbon are good alternatives.

Whisking continuously.

It is about 4 ounces of roux to a quart of liquid

Bring to a simmer and cook, stirring occasionally, until gravy thickens and no longer tastes floury about 5 minutes.

I always pass gravy through a fine sieve to confirm that there are no huge lumps of flour or vegetables that were missed; season with salt and pepper. Add finely chopped sage and keep warm.

If adding rustic or woody stem herbs such as thyme or rosemary; add at the beginning. If adding delicate herbs such as parsley or sage at the end.

I think that if you follow that above steps of My Best Gravy for Thanksgiving Dinner you will be pleased with the results.

Tip: A coffee thermos makes a great vessel for keeping gravy warm.


Solutions for typical problems when making gravy.

Lumpy Gravy

Strain it again through a fine-mesh strainer. Or use an electric appliance such as blender, or with a stick blender, until smooth.

Bland Gravy

A little more salt. If that doesn’t work, add Worcestershire sauce.

Gravy that is Too Thick

Whisk in boxed chicken broth until you’ve reached the right consistency, then taste and re-season the gravy again as needed.

Gravy that is Too Thin

Make a cornstarch slurry which equal parts cornstarch and COLD water. (1 tbsp. of cornstarch to 1 tbsp. of cold water to start) Whisk in a little the slurry and bring to a simmer. I have also used Robin Hood Easy Blend flour to thicken my gravy.

Thanksgiving Dinner 2014

Thanksgiving Dinner 2014

Thanksgiving DInner 2017

Thanksgiving Plate for 2017